Windows Server Backup Configuration
1. Prerequisites & Role Installation
Section titled “1. Prerequisites & Role Installation”Before starting the setup wizard, verify that your target storage hardware is connected and that the Windows Server Backup feature is installed.
Requirements
Section titled “Requirements”- Dedicated Backup Disk: Ensure an external or secondary internal disk is connected. Note that Windows Server Backup will format target disks dedicated solely to backups.
- Make sure the drive is larger in size than the total size of whatever you will be backing up
- Privileges: Administrator access is required to install server roles and manage backup jobs.
Installation via GUI
Section titled “Installation via GUI”- Open Server Manager.
- Click Manage in the top right corner and select Add Roles and Features.
- Advance to the Features section.
- Check the box for Windows Server Backup (include management tools if prompted).
- Click Install and wait for feature completion.
2. Initial Backup Schedule Configuration
Section titled “2. Initial Backup Schedule Configuration”Step 1: Launch the Backup Schedule Wizard
Section titled “Step 1: Launch the Backup Schedule Wizard”Open Windows Server Backup. In the right-hand Actions pane, click Backup Schedule… to launch the wizard.
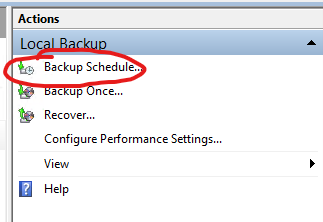
Step 2: Configure Schedule Parameters
Section titled “Step 2: Configure Schedule Parameters”Follow the wizard using the standard settings below:
| Wizard Step | Recommended Setting |
|---|---|
| Getting Started | Click Next. |
| Select Backup Configuration | Select Full Server (recommended). |
| Specify Backup Time | Select Once a day and set time to 9:00 PM (unless otherwise specified). |
| Specify Destination Type | Select Back up to a hard disk that is dedicated for backups (recommended). |
| Specify Destination Disk | Select the external/internal target drive currently connected to the server. |
| Confirmation & Summary | Review settings and click Finish. |
Step 3: Run Initial Test Backup
Section titled “Step 3: Run Initial Test Backup”Once complete, run an immediate manual backup to test the configuration:
- Click Backup Once in the right-hand Actions pane.
- Select Scheduled backup options and click Backup.
3. Adding Additional Destination Drives (Drive Rotation)
Section titled “3. Adding Additional Destination Drives (Drive Rotation)”If you are setting up off-site drive rotation or adding extra backup target disks, follow these steps:
- Ensure the new backup disk is physically connected to the server.
- Open Windows Server Backup and click Backup Schedule… in the Actions pane.
- Select Modify backup and click Next.
- Step through the previous wizard options until you reach Specify Destination Disk.
- When prompted to modify destinations:
- Select Add more backup destinations and click Next.
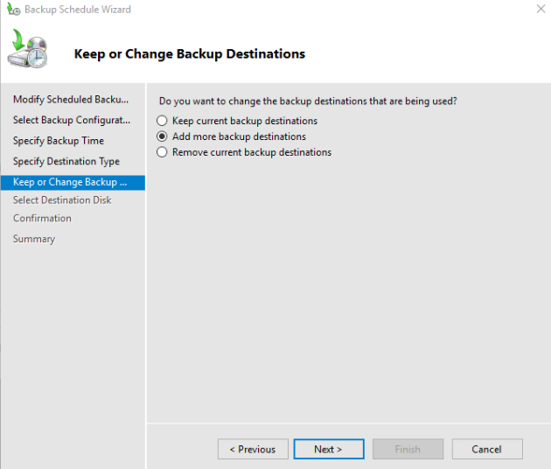
- Select Add more backup destinations and click Next.
- Check the box next to your newly attached drive and complete the wizard.
- Execute an immediate test run: click Backup Once $\rightarrow$ Scheduled backup options $\rightarrow$ Backup.
4. Quick Troubleshooting
Section titled “4. Quick Troubleshooting”- Destination Disk Not Showing in List: Click Show All Available Disks in the selection screen. Note that target disks will be reformatted specifically for backup use.
- Backup Failed / VSS Error: Volume Shadow Copy Service may be frozen. Restart the service via administrative prompt:
Terminal window net stop vss && net start vss